Control Tiers for AI‑enabled Processes: Controlling When AI Acts, Asks, or Stops
This post is part of the Autonomy and Escalation pillar.
This article explains how to design AI control levels (tiers) so you can decide when AI acts, asks, or stops, matching autonomy to risk.
AI operates at different levels of autonomy: sometimes it suggests, sometimes it acts within guardrails, sometimes it steps back and hands full control to a human.
If you don’t design these levels on purpose, there is a high chance you would end up with either: - AI that does too much with too little oversight. - AI that does almost nothing, because every decision is routed to a human who can’t keep up.
In Composite Intelligence, we talked about systems where rules, models, and humans share the work. In Composite Accountability, we made each part prove it did its job. The next logical step is to decide: how far are we willing to let the system go on its own?
That’s what Control Tiers are: predefined levels of autonomy, each with: - Clear permissions (what the system may do). - Clear preconditions (what must be true to operate at this tier). - Clear escape routes (when to escalate or shut itself off).
What are the four levels of AI autonomy?
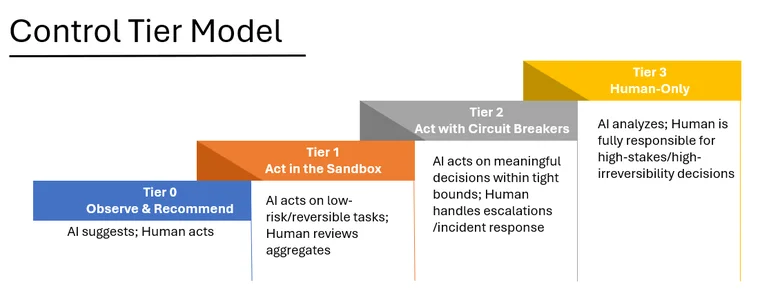
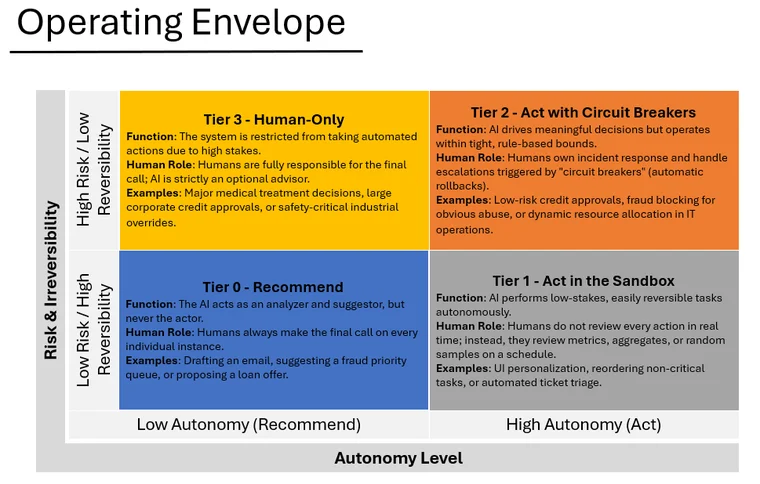
The 4 Control Tiers
| Tier | Name | Permissions | Example |
|---|---|---|---|
| 0 | Observe | Analysis & Suggestions | Draft email, suggest queue |
| 1 | Act in the Sandbox | Low-risk, reversible actions | Internal tagging, non-critical routing |
| 2 | Act with Circuit Breakers | High-leverage, bounded actions | Auto-approve low-risk, auto-block abuse |
| 3 | Human Only | No automated actions permitted | Clinical diagnosis, large finance |
You should be able to say: "This workflow runs at Tier N, and here’s why."
How Tiers Connect to Rules, Models, and Humans
Each Control Tier corresponds to a different mix of your composite actors.
Tier 0 – Observe
- Models: Active (scoring, ranking, summarizing).
- Rules: Constrain what can be suggested (no illegal or out-of-policy options).
- Humans: Always the final decision maker.
Tier 1 – Low-risk Autonomy
- Models: Propose actions in narrow, low-stakes domains.
- Rules: Strictly define the allowed action space and auto-revert conditions.
- Humans: Review metrics and spot-check samples, not every individual decision.
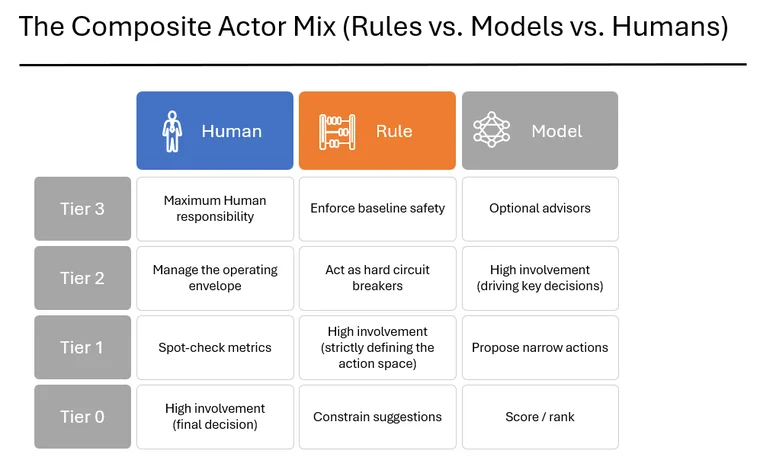
Tier 2 – High-leverage Autonomy
- Models: Drive key decisions within defined guardrails.
- Rules: Encode hard constraints and circuit breakers (loss caps, safety limits).
- Humans: Handle escalations, approve upgrades, and own incident response.
Tier 3 – Human Only
- Models: Optional advisors and analysis tools.
- Rules: Still enforce baseline safety and compliance constraints.
- Humans: Fully responsible for the final call.
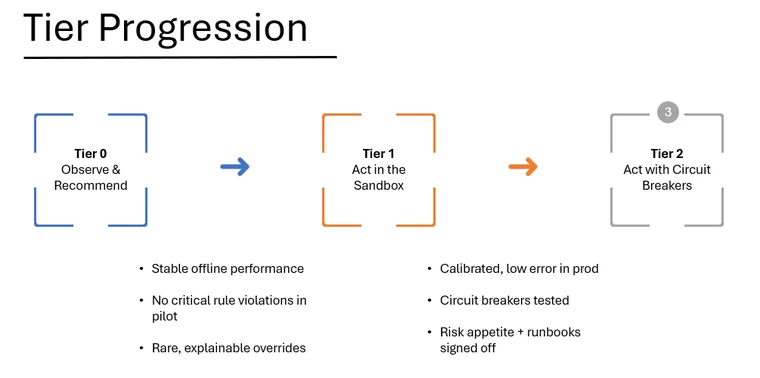
Advancing Tiers Should Be Governed by Proof
Tier upgrades should be earned with evidence.
To move from Tier 0 → Tier 1, you might require:
To move from Tier 1 → Tier 2, the bar goes up:
The principle is simple: no evidence, no tier upgrade. Each level up is a governance event, not a configuration tweak.
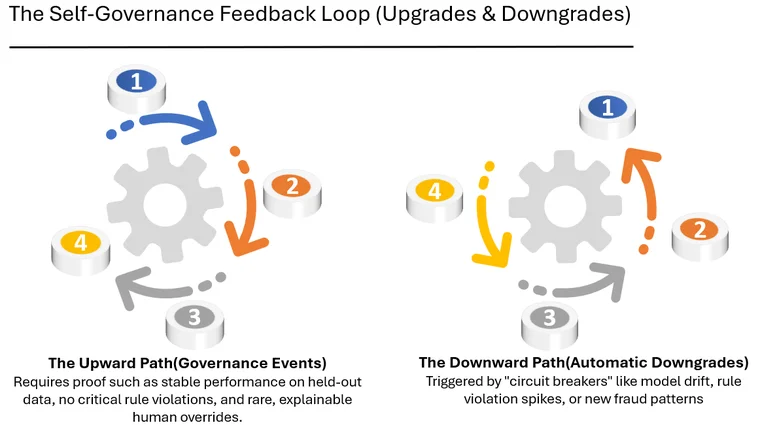
How do you design for automatic AI failure?
The other side of Control Tiers is how you move down when things go wrong. This is how you design Escalation Protocols and controlled degradation paths:
The system should self-govern by saying:
“Given the current data and metrics, I no longer meet the bar for this tier. I’m downgrading myself.”
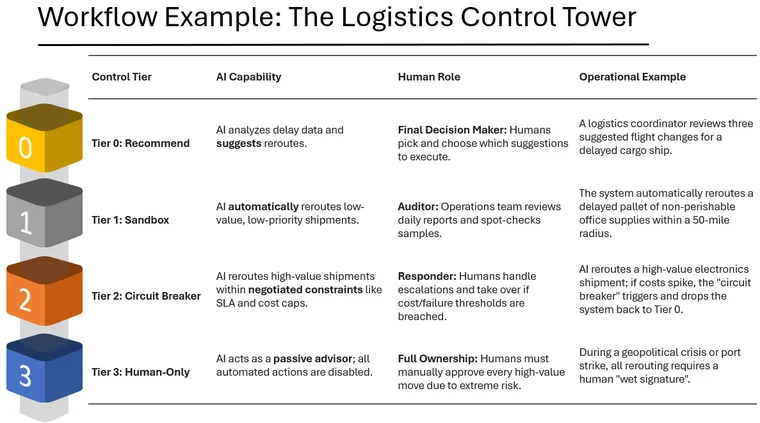
Example: Control Tiers in an Operations Workflow
Take a logistics control tower.
- Tier 0: AI suggests reroutes for delayed shipments. Humans pick and choose.
- Tier 1: AI automatically reroutes low-value, low-priority shipments within a small radius.
- Tier 2: AI reroutes high-value shipments within negotiated constraints. If cost overruns spike, it falls back to Tier 0.
- Tier 3: In crisis (e.g., geopolitical disruption), all reroutes require human approval.
Same underlying system, different tiers of control depending on risk, context, and the current health of the components.
Designing Control Tiers in practice
For each major AI-influenced workflow, ask: 1. What is the default Control Tier today? 2. What would Tier 0, 1, 2, 3 actually look like here? 3. What proof would we need to move up a tier? 4. What conditions should trigger an automatic downgrade? 5. Who owns the tier decisions?
Control Tiers turn “keep a human in the loop” from a slogan into a design: they define when AI acts, when it asks, and when it stops itself.
Related in this series
- AI Incident Response and Escalation: Learn how systems move between control tiers at runtime.
- What is Composite AI Intelligence?: See how rules and humans provide the guardrails for autonomous tiers.
Download the Architecture of Proof Checklist
Ready to implement? Get the definitive checklist for building verifiable AI systems.